Day 43 : Exercise
[이론문제]
7. 다음 HTML 페이지의 CSS3 스타일 시트를 파일에 저장하고 @import를 이용하여 수정하라.
<!DOCTYPE html>
<html lang="en">
<head>
	<meta charset="UTF-8">
	<meta name="viewport" content="width=device-width, initial-scale=1.0">
	<title>CSS3</title>
	<style>
		p {
			color: blue;
			text-align: center;
		}
	</style>
</head>
<body>
	<p>test</p>
</body>
</html>
style.css
p {
	color : blue;
	text-align : center;
}
HTML 파일 수정
<!DOCTYPE html>
<html lang="en">
<head>
	<meta charset="UTF-8">
	<meta name="viewport" content="width=device-width, initial-scale=1.0">
	<title>CSS3</title>
	<style>
		@import url(style.css);
	</style>
</head>
<body>
	<p>test</p>
</body>
</html>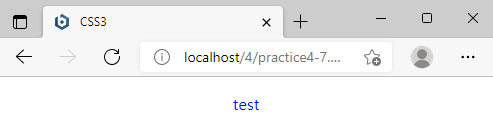
8. 다음 CSS3와 HTML 소스가 있다.
(1) 첫 번째 <p> 태그인 다음 태그에 적용되는 CSS3 스타일 시트를 작성하라.
<p style="color:red; font-size:3em">test <span>code</span></p>p {
color: red;
font-size: 3em;
}
(2) 두 번째 <span> 태그인 다음 태그에 적용되는 CSS3 스타일 시트를 작성하라.
<span style="color:green">code</span>span {
color: green;
}11. 다음 링크 태그에 대해 답하라.
<a href="http://www.site.com">site</a>(1) 링크의 텍스트 색을 파란색으로 하고 밑줄을 없애도록 셀렉터와 스타일 시트를 작성하라.
(2) 마우스를 올리면 링크 텍스트가 기존 폰트의 2배가 되고 내리면 원래대로 돌아오도록 셀렉터와 스타일 시트를 작성하라.
(3) www.site.com을 방문하고 난 후 링크 색이 violet이 되도록 셀렉터와 스타일 시트를 작성하라.
<!DOCTYPE html>
<html lang="en">
<head>
	<meta charset="UTF-8">
	<meta name="viewport" content="width=device-width, initial-scale=1.0">
	<title>링크</title>
	<style>
		a {
			color: blue;
			text-decoration: none;
		}
		a:hover {
			font-size: 2em;
		}
		a:visited {
			color: violet;
		}
	</style>
</head>
<body>
	<a href="http://www.site.com">site</a>
</body>
</html>
[실습문제]
1. 다음 HTML 소스에 태그 이름 셀렉터로 스타일 시트를 삽입하여 브라우저 출력과 같게 하라.
<!DOCTYPE html>
<html lang="en">
<head>
	<meta charset="UTF-8">
	<meta name="viewport" content="width=device-width, initial-scale=1.0">
	<title>태그 셀렉터 만들기</title>
	<style>
		body {
			background-color: lightpink;
		}
		h3 {
			text-align: right;
			color: darkblue;
		}
		p {
			color: rebeccapurple;
		}
		span {
			background-color: deepskyblue;
		}

	</style>
</head>
<body>
	<h3>소연재</h3>
	<hr>
	<p>저는 체조 선수 소연재입니다. <span>음악</span>을 들으면서 책읽기를 좋아합니다.
	<span>김치찌개</span>와 <span>막국수</span>를 무척 좋아합니다.</p>
</body>
</html>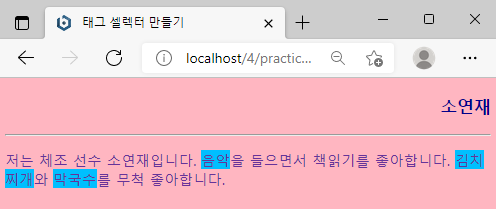
2. 다음 HTML 소스에 태그 이름 셀렉터로 스타일 시트를 삽입하여 브라우저 출력과 같게 하라.
<!DOCTYPE html>
<html lang="en">
<head>
	<meta charset="UTF-8">
	<meta name="viewport" content="width=device-width, initial-scale=1.0">
	<title>텍스트 꾸미기</title>
	<style>
		p {
			background-color: aliceblue;
			color: brown;
			font-family: Lucida Console;
			font-size: 10px;
		}
		p > span {
			font-size: 1.5em;
			text-decoration: underline;
		}
	</style>
</head>
<body>
	<h3>텍스트와 폰트</h3>
	<hr>
	<p>AliceBlue 바탕색에 Brown 색의 "Lucida Console" 폰트로 10px 크기이고 <span>저는 이보다 1.5배 큽니다.</span></p>
</body>
</html>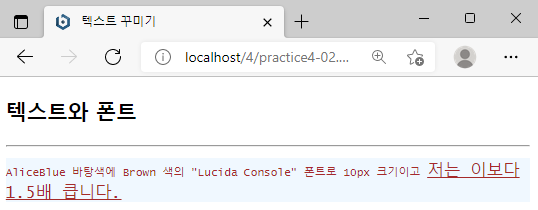
3. 다음과 같이 색 이름, 색 코드, 색을 보여주는 테이블을 작성하라.
<!DOCTYPE html>
<html lang="en">
<head>
	<meta charset="UTF-8">
	<meta name="viewport" content="width=device-width, initial-scale=1.0">
	<title>색 테이블 만들기</title>
</head>
<body>
	<h3>색 이름과 코드</h3>
	<hr>
	<table border="1px">
		<thead>
			<tr><th>이름</th><th>코드</th><th>색</th><th>이름</th><th>코드</th><th>색</th></tr>
		</thead>
		<tbody>
			<tr><td>Brown</td><td>#A52A2A</td><td style="background-color:Brown; width: 50px; height: 20;"></td><td>DeepSkyBlue</td><td>#00BFFF</td><td style="background-color:#00BFFF; width: 50px; height: 20;"></td></tr>
			<tr><td>Blueviolet</td><td>#8A2BE2</td><td style="background-color:blueviolet;"></td><td>Gold</td><td>#FFD700</td><td style="background-color:#FFD700"></td></tr>
			<tr><td>DarkOrange</td><td>#FF8C00</td><td style="background-color:darkorange;"></td><td>OliveDrab</td><td>#6B8E23</td><td style="background-color:#6B8E23"></td></tr>
		</tbody>
	</table>
</body>
</html>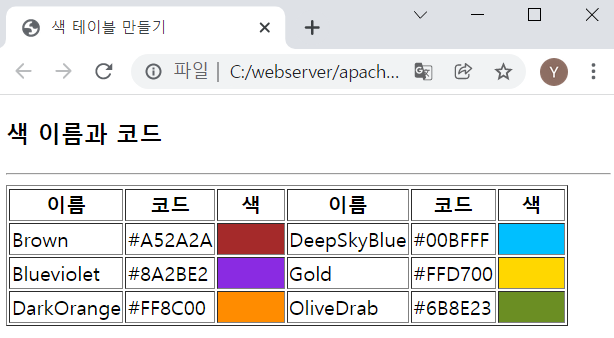
4. HTML 태그를 수정하지 말고 셀렉터와 스타일 시트를 삽입하여 다음과 같이 출력되게 하라.
<!DOCTYPE html>
<html lang="en">
<head>
	<meta charset="UTF-8">
	<meta name="viewport" content="width=device-width, initial-scale=1.0">
	<title>셀렉터 만들기</title>
	<style type="text/css">
		body.main {
			background-color: lightblue;
		}
		.headline {
			text-align: center;
			color: darkred;
		}
		div.help {
			color: darkblue;
		}
		p.help {
			color: red;
			font-size: 1.5em;
		}
		#hot {
			color: blue;
			background-color: orange;
		}
	</style>
</head>
<body class="main">
	<h3 class="headline">클래스 셀렉터</h3>
	<hr>
	<div class="help">도움말</div>
	<p class="help">!!경고 메시지</p>
	<p id="hot">뜨거운 태양</p>
</body>
</html>
5. HTML 태그를 수정하지 말고 셀렉터와 스타일 시트를 삽입하여 다음과 같이 출력되게 하라.
<!DOCTYPE html>
<html lang="en">
<head>
	<meta charset="UTF-8">
	<meta name="viewport" content="width=device-width, initial-scale=1.0">
	<title>셀렉터</title>
	<style>
		body.main {
			background-color: lightblue;
		}
		h3 {
			color: green;
		}
		p {
			text-indent: 3em;
		}
		#center {
			text-align: center;
		}
		#center strong{
			color: blue;
			background-color: yellow;
		}
		.indent em {
			color: green;

		}
		p > strong {
			color: red;
		}
	</style>
</head>
<body class="main">
	<h3>얼굴</h3>
	<hr>
	<div id="center"><strong>박인희</strong></div>
	<div class="indent">
		<p><em>길</em>을 걷고 산들 무엇하리
			<strong>꽃</strong>이 내가 아니듯 내가
			<strong>꽃</strong>이 될 수 없는 지금...</p>
	</div>
</body>
</html>
6. 아래와 같이 밑줄이 없는 초록색 링크를 만들고 마우스가 올라가면 밑줄과 더불어 violet 색으로 바뀌도록 HTML 페이지를 작성하라.
<!DOCTYPE html>
<html lang="en">
<head>
	<meta charset="UTF-8">
	<meta name="viewport" content="width=device-width, initial-scale=1.0">
	<title>링크 꾸미기</title>
	<style type="text/css">
		a {
			color: green;
			text-decoration: none;
		}
		a:hover {
			color: violet;
			text-decoration: underline;
		}
	</style>
</head>
<body>
	<h3>링크 꾸미기</h3>
	초록색에 밑줄없는 링크. 마우스를 올리면 밑줄과 violet 색으로 변경
	<hr>
	<ul>
		<li><a href="http://www.naver.com">네이버 사이트</a></li>
		<li><a href="http://www.google.com">구글 사이트</a></li>
	</ul>
</body>
</html>
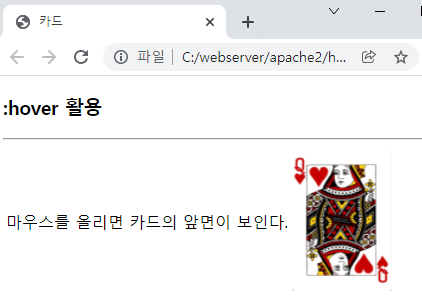
7. <div> 태그를 이용하여 카드의 뒷면을 출력하고, 마우스를 올리면 카드의 앞면이 보이게 HTML 페이지를 작성하라.
<!DOCTYPE html>
<html lang="en">
<head>
	<meta charset="UTF-8">
	<meta name="viewport" content="width=device-width, initial-scale=1.0">
	<title>카드</title>
	<style type="text/css">
		div {
			width: 100px;
			height: 140px;
			background-image: url("media/cardback.jpg");
			background-size: 100px 140px;
		}
		div:hover {
			background-image: url("media/cardfront.png");
			background-size: 100px 140px;
		}
	</style>
</head>
<body>
	<h3>:hover 활용</h3>
	<hr>
	<table>
		<tr><td>마우스를 올리면 카드의 앞면이 보인다.</td>
			<td><div id="img"></div></td></tr>
	</table>
</body>
</html>
8. <img> 태그로 이미지를 출력하고, 액자 모양의 이미지 테두리를 만들어라. 테두리의 두께는 15px, 패딩은 5px로 하여 테두리와 이미지 사이에 공간이 있게 하라.
<!DOCTYPE html>
<html lang="en">
<head>
	<meta charset="UTF-8">
	<meta name="viewport" content="width=device-width, initial-scale=1.0">
	<title>이미지 테두리 만들기</title>
	<style type="text/css">
		img {
			border: 30px solid hotpink;
			border-image: url("https://i.pinimg.com/550x/10/50/bc/1050bc2e68b11891a95a525ed3219400.jpg") 100 round;
			padding: 5px;
		}
	</style>
</head>
<body>
	<h3>이미지 테두리 만들기</h3>
	<hr>
	<img src="media/spongebob.png" alt="스폰지밥 이미지" width="200" height="200">
</body>
</html>
9. 다음 페이지를 작성하라. Most Visited Pages 텍스트를 text-shadow로 꾸미고, 이미지에 마우스를 올리면 box-shadow를 이용하여 박스에 그림자가 보이게 하라.
<!DOCTYPE html>
<html lang="en">
<head>
	<meta charset="UTF-8">
	<meta name="viewport" content="width=device-width, initial-scale=1.0">
	<title>text-shadow와 box-shadow</title>
	<style type="text/css">
		h3 {
			text-shadow: 2px 2px 2px blue;
			color: yellow;
			text-align: center;
			font-size: 20px;
		}
		img:hover {
			box-shadow: 2px 2px 2px purple,
						0px 0px 6px purple,
						0px 0px 5px purple;
		}
	</style>
</head>
<body>
	<h3>Most Visited Pages</h3>
	<hr>
	<table>
		<tr style=""><th><img src="media/1.png" alt="네이버"></th>
			<th><img src="media/2.png" alt="줌 수업"></th>
			<th><img src="media/3.png" alt="수업자료"></th></tr>
</body>
</html>